Quick note: links to documentation & further reading exists throughout this post, look for those links to get additional information & documentation links on topics/ tools/ technologies mentioned.
In this tutorial, I will walk you through building a quick static site by doing a static build using ReactJS & create-react-app, then show you how to deploy that static site on AWS using S3 buckets as well as how to cache it & add SSL certificates with CloudFront CDN & Certificate Manager.
All you need to get started is an AWS account & a domain, you can either purchase one on AWS or use one from another registrar. If you're a beginner I recommend purchasing the domain directly from AWS as it's the most straightforward approach, however, if you have an existing domain with an external registrar you can use it in a Route 53 Hosting Zone by first creating a hosting zone, then by pointing the domain to the AWS name servers for your hosting zone (this is covered later). For this tutorial I will be using an external domain as I already have one for testing & tutorials. Behold: 0000.quest
AWS Services Overview
Before we get started, here is a brief overview of the AWS services used in this walkthrough. Feel free to skip this section if you're already familiar with the services used here.
AWS S3
S3 or Simple Storage Service, is Amazon's solution for object storage. It's a way to store files within the AWS ecosystem & seamlessly integrates with other AWS services as a data source, it can also do other things, but we're not using any of that 😅. We'll be using it as a file storage system for the static files our site serves.
AWS Route 53
Route 53 is the native routing service in the AWS ecosystem. This is a complex service that handles all your AWS routing needs to route user traffic to your applications & services, but in this walkthrough we'll only be leveraging the AWS Route 53 Hosted Zones feature. Hosted Zones allow you to manage the DNS records for domains accessible in your AWS account.
AWS Certificate Manager
Certificate Manager is the AWS integrated service that handles creation, storage & renewals for SSL certificates. We'll be leveraging this service to create & serve our SSL certificates for our deployed site.
AWS CloudFront
CloudFront is AWS's global CDN service, CloudFront allows you to cache data at AWS global endpoints so that users will get data from a source close to them geographically, ensuring low latency for the data they fetch. In this walkthrough, we'll be leveraging CloudFront to cache our static site globally & we'll also be using it to serve our site's SSL certificate.
Lets get started 😎👍
Using create react app to build a static site
To get started, let's quickly create a sample React app that has a build configured to export a static site. Even if you have a project in mind to deploy, I recommend going through the motions with a simple sample site, as you may run into implementation specific issues with your project & if you've never gone through the motions, it can be hard to determine whether you made a mistake in the deployment processes or if there are implementation specific issues you're facing.
I assume you have nodejs installed if you're doing a react app, but just in case you're doing this tutorial for funsies, you can download nodejs here (nodejs.org).
Create a sample project using create-react-app. Run the following in a directory where you want to save the sample project. Feel free to change the name, but for this example I'll be calling it samplesite.
npx create-react-app samplesitecd samplesite
npm run start
npm run buildsamplesite
build
node_modules
public
src
Setup S3 buckets for domain
Next thing to do is setup the S3 buckets for the static hosting. We'll create two buckets, one for the primary site & then a second one to redirect the www subdomain to the primary site. It seems to be commonplace to make the www subdomain the primary site, but it doesn't really matter, its a matter of preference & I prefer to get rid of that ugly www subdomain on my URL 😤.
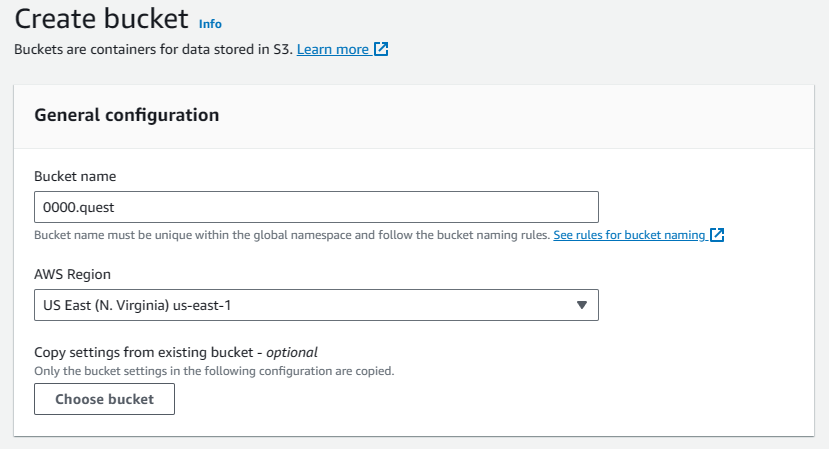
Log into the AWS Management Console & go to the S3 console by searching for S3 in the search bar & clicking on it. Click on buckets in the navigation menu on the left to get to the buckets tab. In the buckets tab, select create bucket.
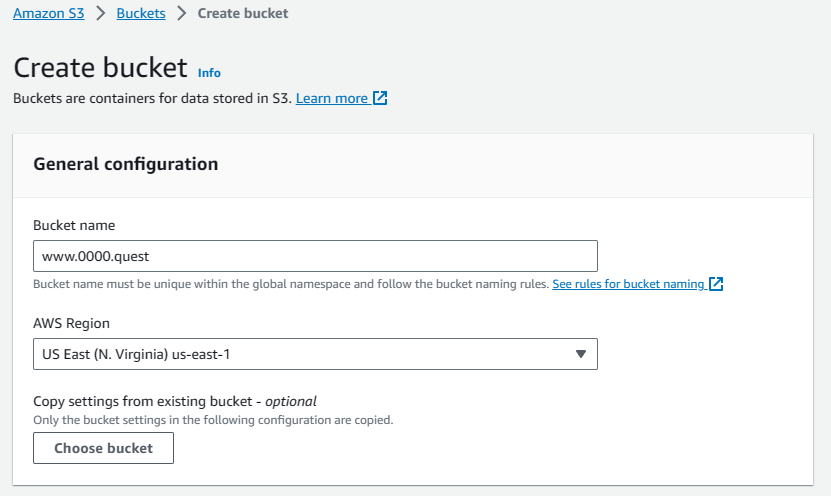
First we'll be creating the main bucket, it must have the same name as the domain you'll be hosting, so since I'm using 0000.quest that's what I'll be naming this bucket. For CloudFront to work, you'll need to host the bucket in the us-east-1 region, so select that. Don't worry if you or your primary user base is in another region, CloudFront does global endpoint caching, but your primary bucket needs to be in this region for some reason.
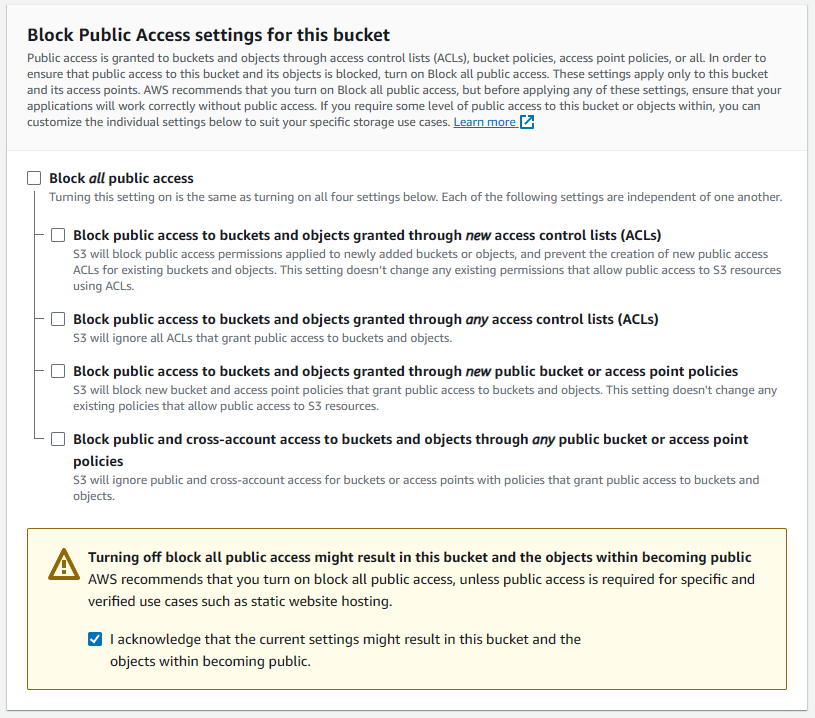
For this bucket, we'll need to enable public access, so uncheck the Block all public access options & check the acknowledgement checkbox warning that this bucket's contents will be public. This is a public website so that's kinda the whole point 😅.
Leave all other settings default & add custom tags if you need them. Then hit the create bucket button to create the bucket.
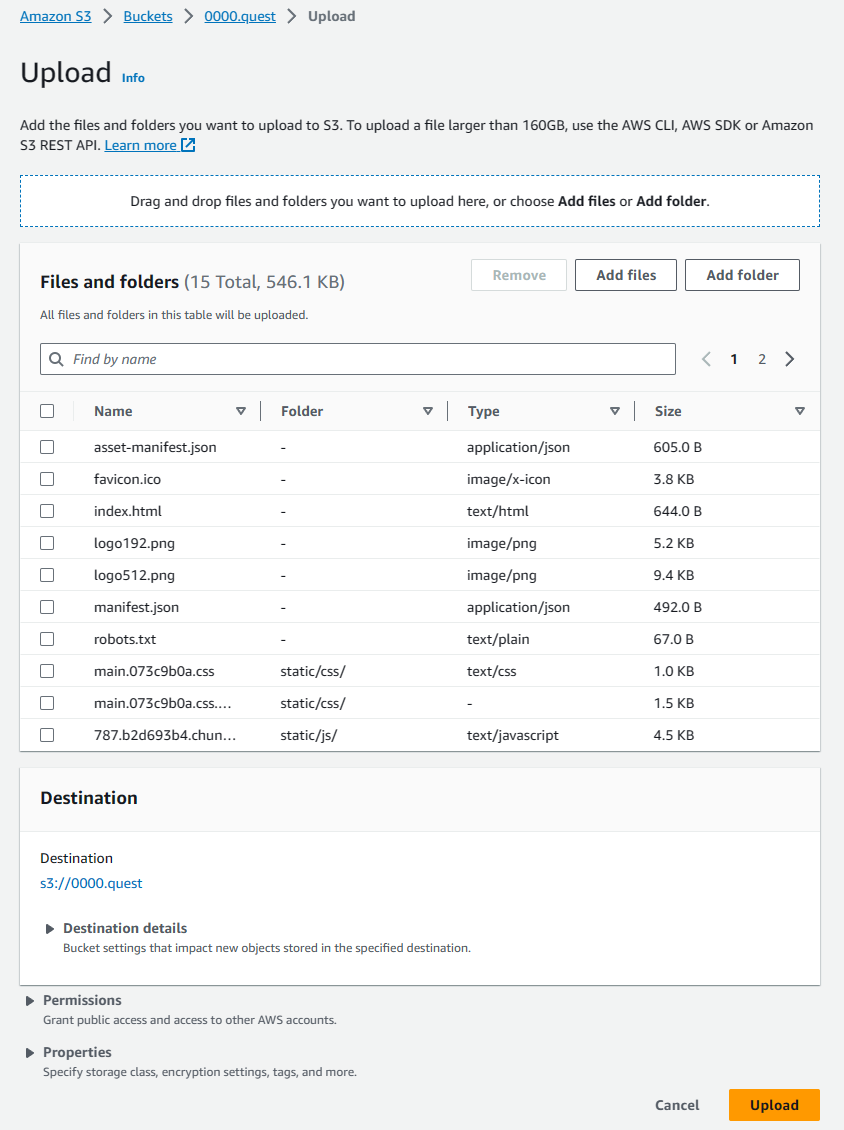
Once the bucket is created, you'll be taken back to the buckets tab of the S3 console. Select the bucket you just created & that will take you to the object view window for that bucket. Here, we will manually upload the static build of the samplesite we created in an earlier step. Open the directory containing the build (samplesite/build), select everything, directories included, & drag them into the object view of the bucket. You'll see the window change to accept the drop. The upload preview will look like this:
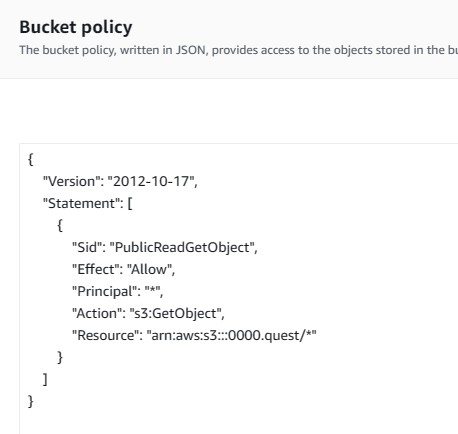
That should have our sample site's static assets available in the bucket to be served on our URL. We're not quite done configuring this bucket yet, there's one more step for our initial configuration. We need to set explicit permissions so all users can access the files in the bucket. Navigate back to the object view by clicking on the bucket from the buckets tab of the S3 console. Once there, navigate to the permissions tab, scroll down to the bucket policy, it should be empty. Hit the edit button to create a new bucket policy. Paste the following policy in the editor & hit save changes.
{
    "Version": "2012-10-17",
    "Statement": [
        {
            "Sid": "PublicReadGetObject",
            "Effect": "Allow",
            "Principal": "*",
            "Action": "s3:GetObject",
            "Resource": "arn:aws:s3:::<bucket_name_here>/*"
        }
    ]
}
If you're not familiar with AWS policies, here's a brief explanation of what it does. This policy statement grants everyone the GetObject permission on the root of the S3 bucket. This means that anyone will be able to view all the files in the bucket. Please don't use this policy for anything but this 😭. The new policy should look like the screenshot below.
For more information about bucket policies, consult the AWS bucket policies & user policies documentation
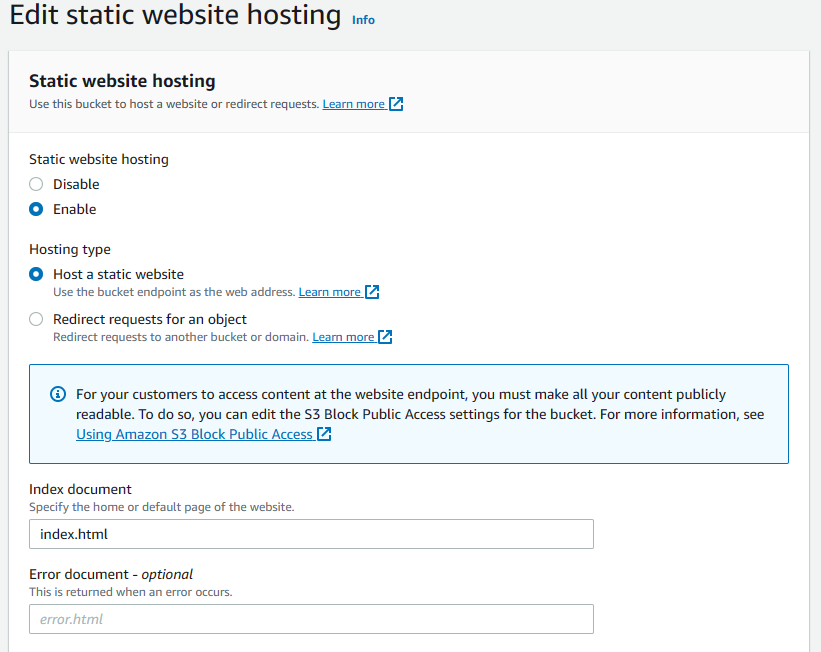
Now that all objects in the bucket are publicly accessible, we can configure the bucket for static site hosting. Navigate back to the bucket's object preview & switch to the properties tab. Scroll all the way to the bottom & hit the edit button on the static website hosting section. Here switch the static website hosting toggle to enable, change the index document to index.html, this is the application entry point for our react app. We don't have an error page so leave the error document blank, leave all other settings to the defaults, then hit the save changes button. Settings should match the screenshot below.
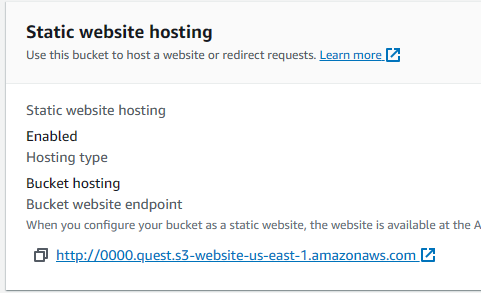
Once that's done, scroll back to the bottom of the properties tab for that bucket & you'll see a URL there, copy that & save it somewhere, you'll need that for the second bucket configuration.
We're done configuring this bucket for now, on to the next bucket, this will be a lot easier to configure as it's just a redirect & won't host any actual content, so few settings will need to change.
Navigate to the buckets tab of the S3 console & hit the create bucket button. This is the redirect bucket for the www subdomain, so it's going to have the www prefixing the domain name, for me it's www.0000.quest since that's the domain I'm using. Again, we're going to need the region to be us-east-1. Leave all other settings default. Since this is just a redirect bucket, the public access isn't necessary, as it won't have any files. Hit create bucket & finish making this bucket.
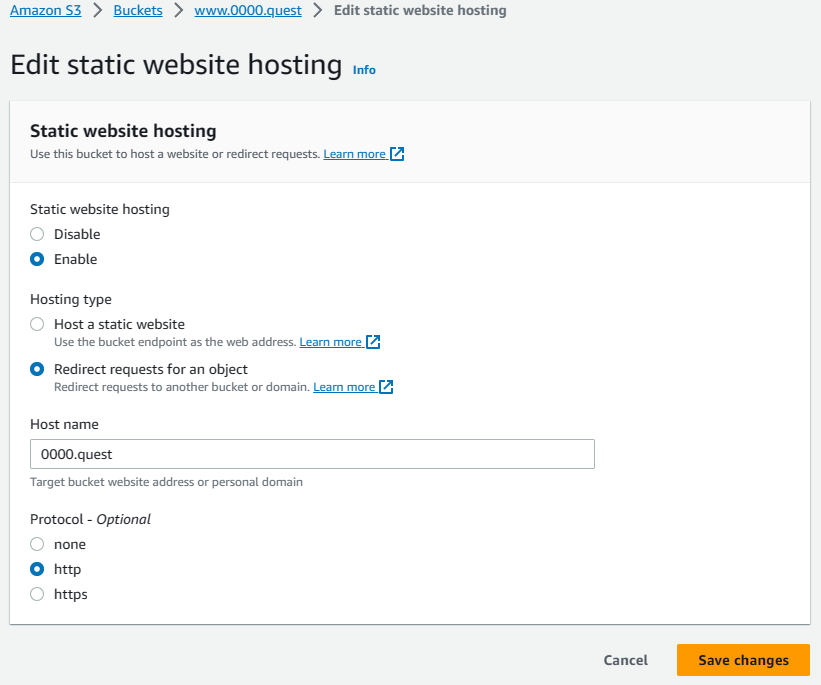
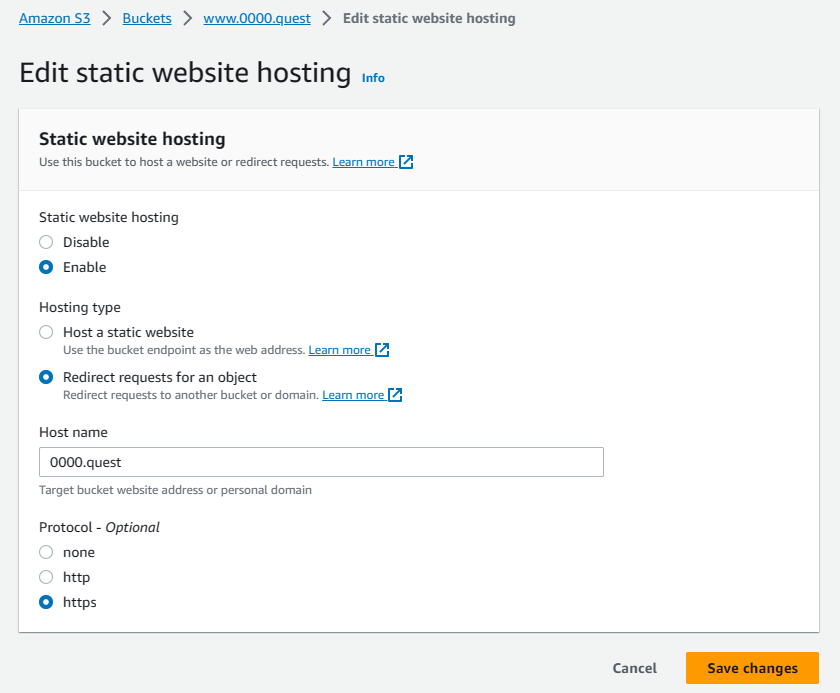
Navigate to the subdomain bucket's properties tab & scroll to the bottom to edit the static website hosting settings. Here, we switch the static website hosting toggle to enable, change the hosting type to redirect requests for an object. Under host name, type your domain name &, for now leave the protocol to HTTP for testing, we'll have to come back & change to HTTPS this later, once we get the SSL certificates setup in CloudFront. Hit save changes.
The www subdomain won't be up & running until we setup some DNS records, but you can currently see the functioning static site on the primary bucket by going to that URL you saved earlier.
Setup the Hosted zone
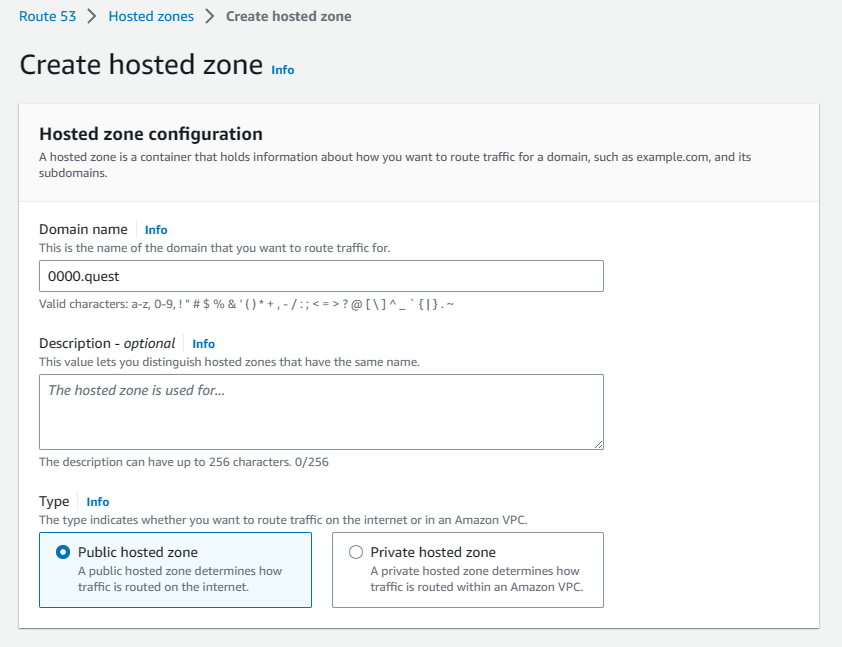
Now that the buckets have been configured, it's time to configure the DNS in the Hosted Zones to get the URL configured & pointing to our bucket. Navigate to the Route 53 console by searching for it in the search bar. Click the Hosted Zones tab & hit the create Hosted Zone button. In the configuration, add your domain name under the domain name field & add a description if you need one, leave all other settings default. Hit the create button to finish creating the Hosted Zone.
Here is an extra step for anyone using an external domain registrar, you can skip this part if you're using a domain in your AWS account. If you are using an external registrar, you'll need to go into your registrar's portal & point your name servers to the name servers in the NS record created for your Hosted Zone. Once you do that, it may take a few minutes to a few hours for that name server change to propagate, depending on how often your registrar updates their records.
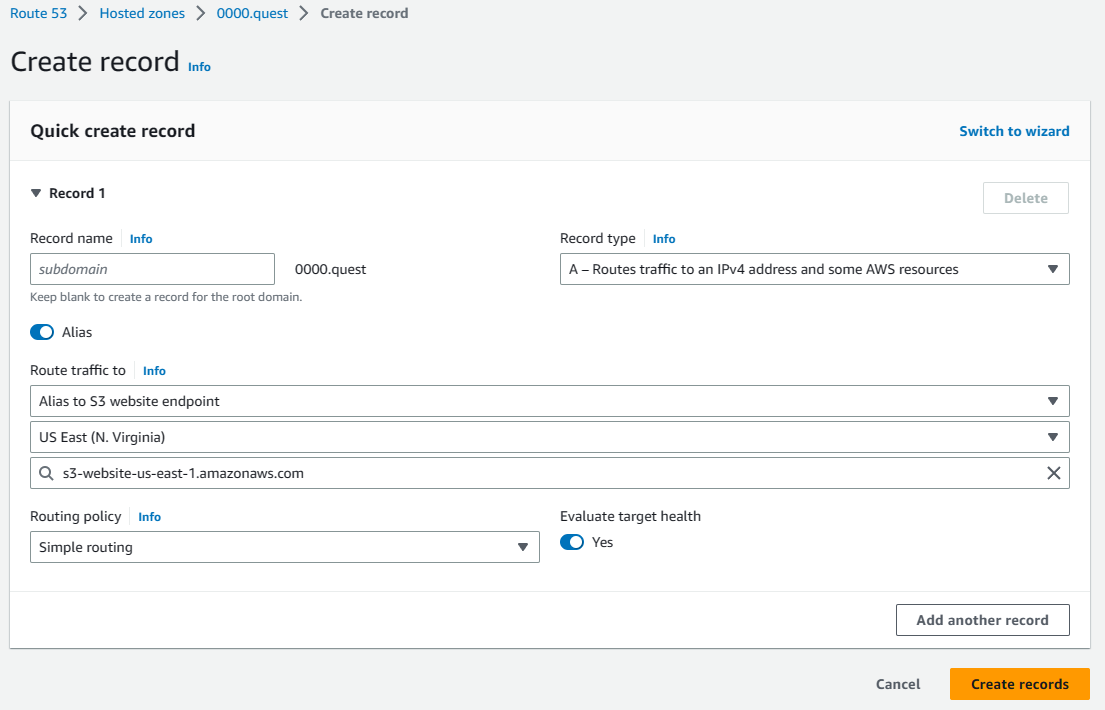
Time to add some records to the DNS that points to the S3 bucket so that your site is served when someone hits your domain. In your Hosted Zone, click the create record button. Leave the subdomain field empty for now. Change the record type to A. Click the alias toggle to update the available fields. Under "routes traffic to" select "Alias to S3 website endpoint," change the region to us-east-1. Under the S3 endpoint field you should see one option, this auto populates for you, click that S3 bucket in the dropdown. This should auto populate from the bucket name. This is why the bucket has to be the domain. Leave everything else default & hit the create records button to finish creating the record.
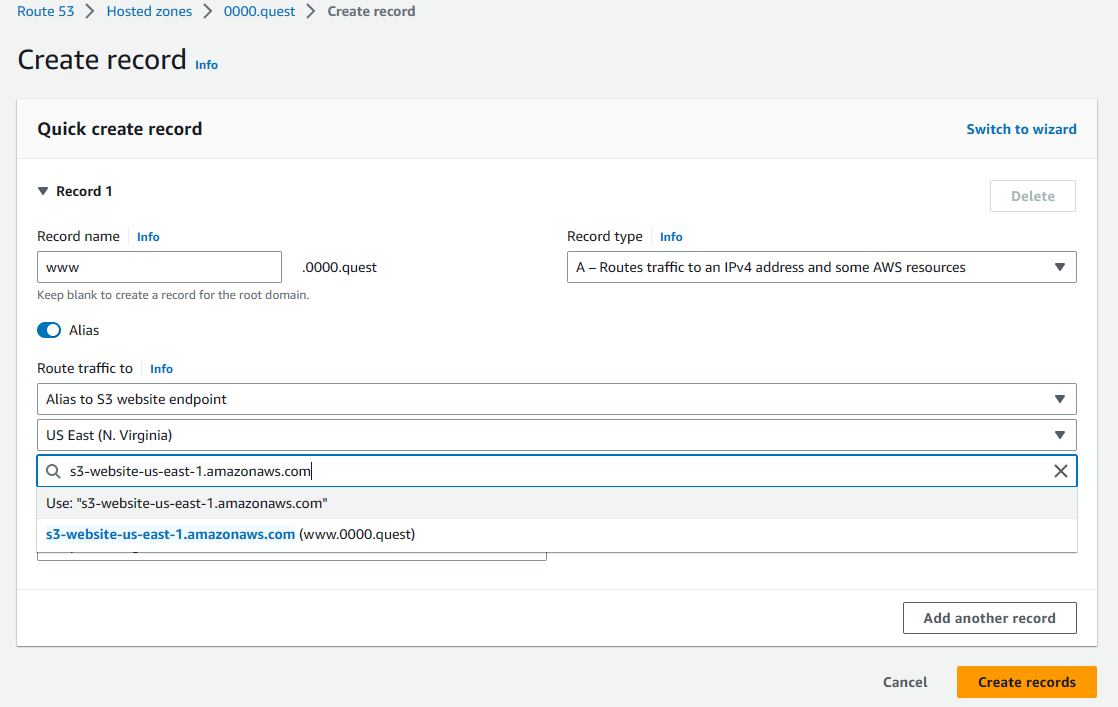
Now we'll add the DNS record for the subdomain, it's exactly the same as the previous record, only difference is that we're adding the www in the subdomain field & selecting the other bucket from the dropdown.
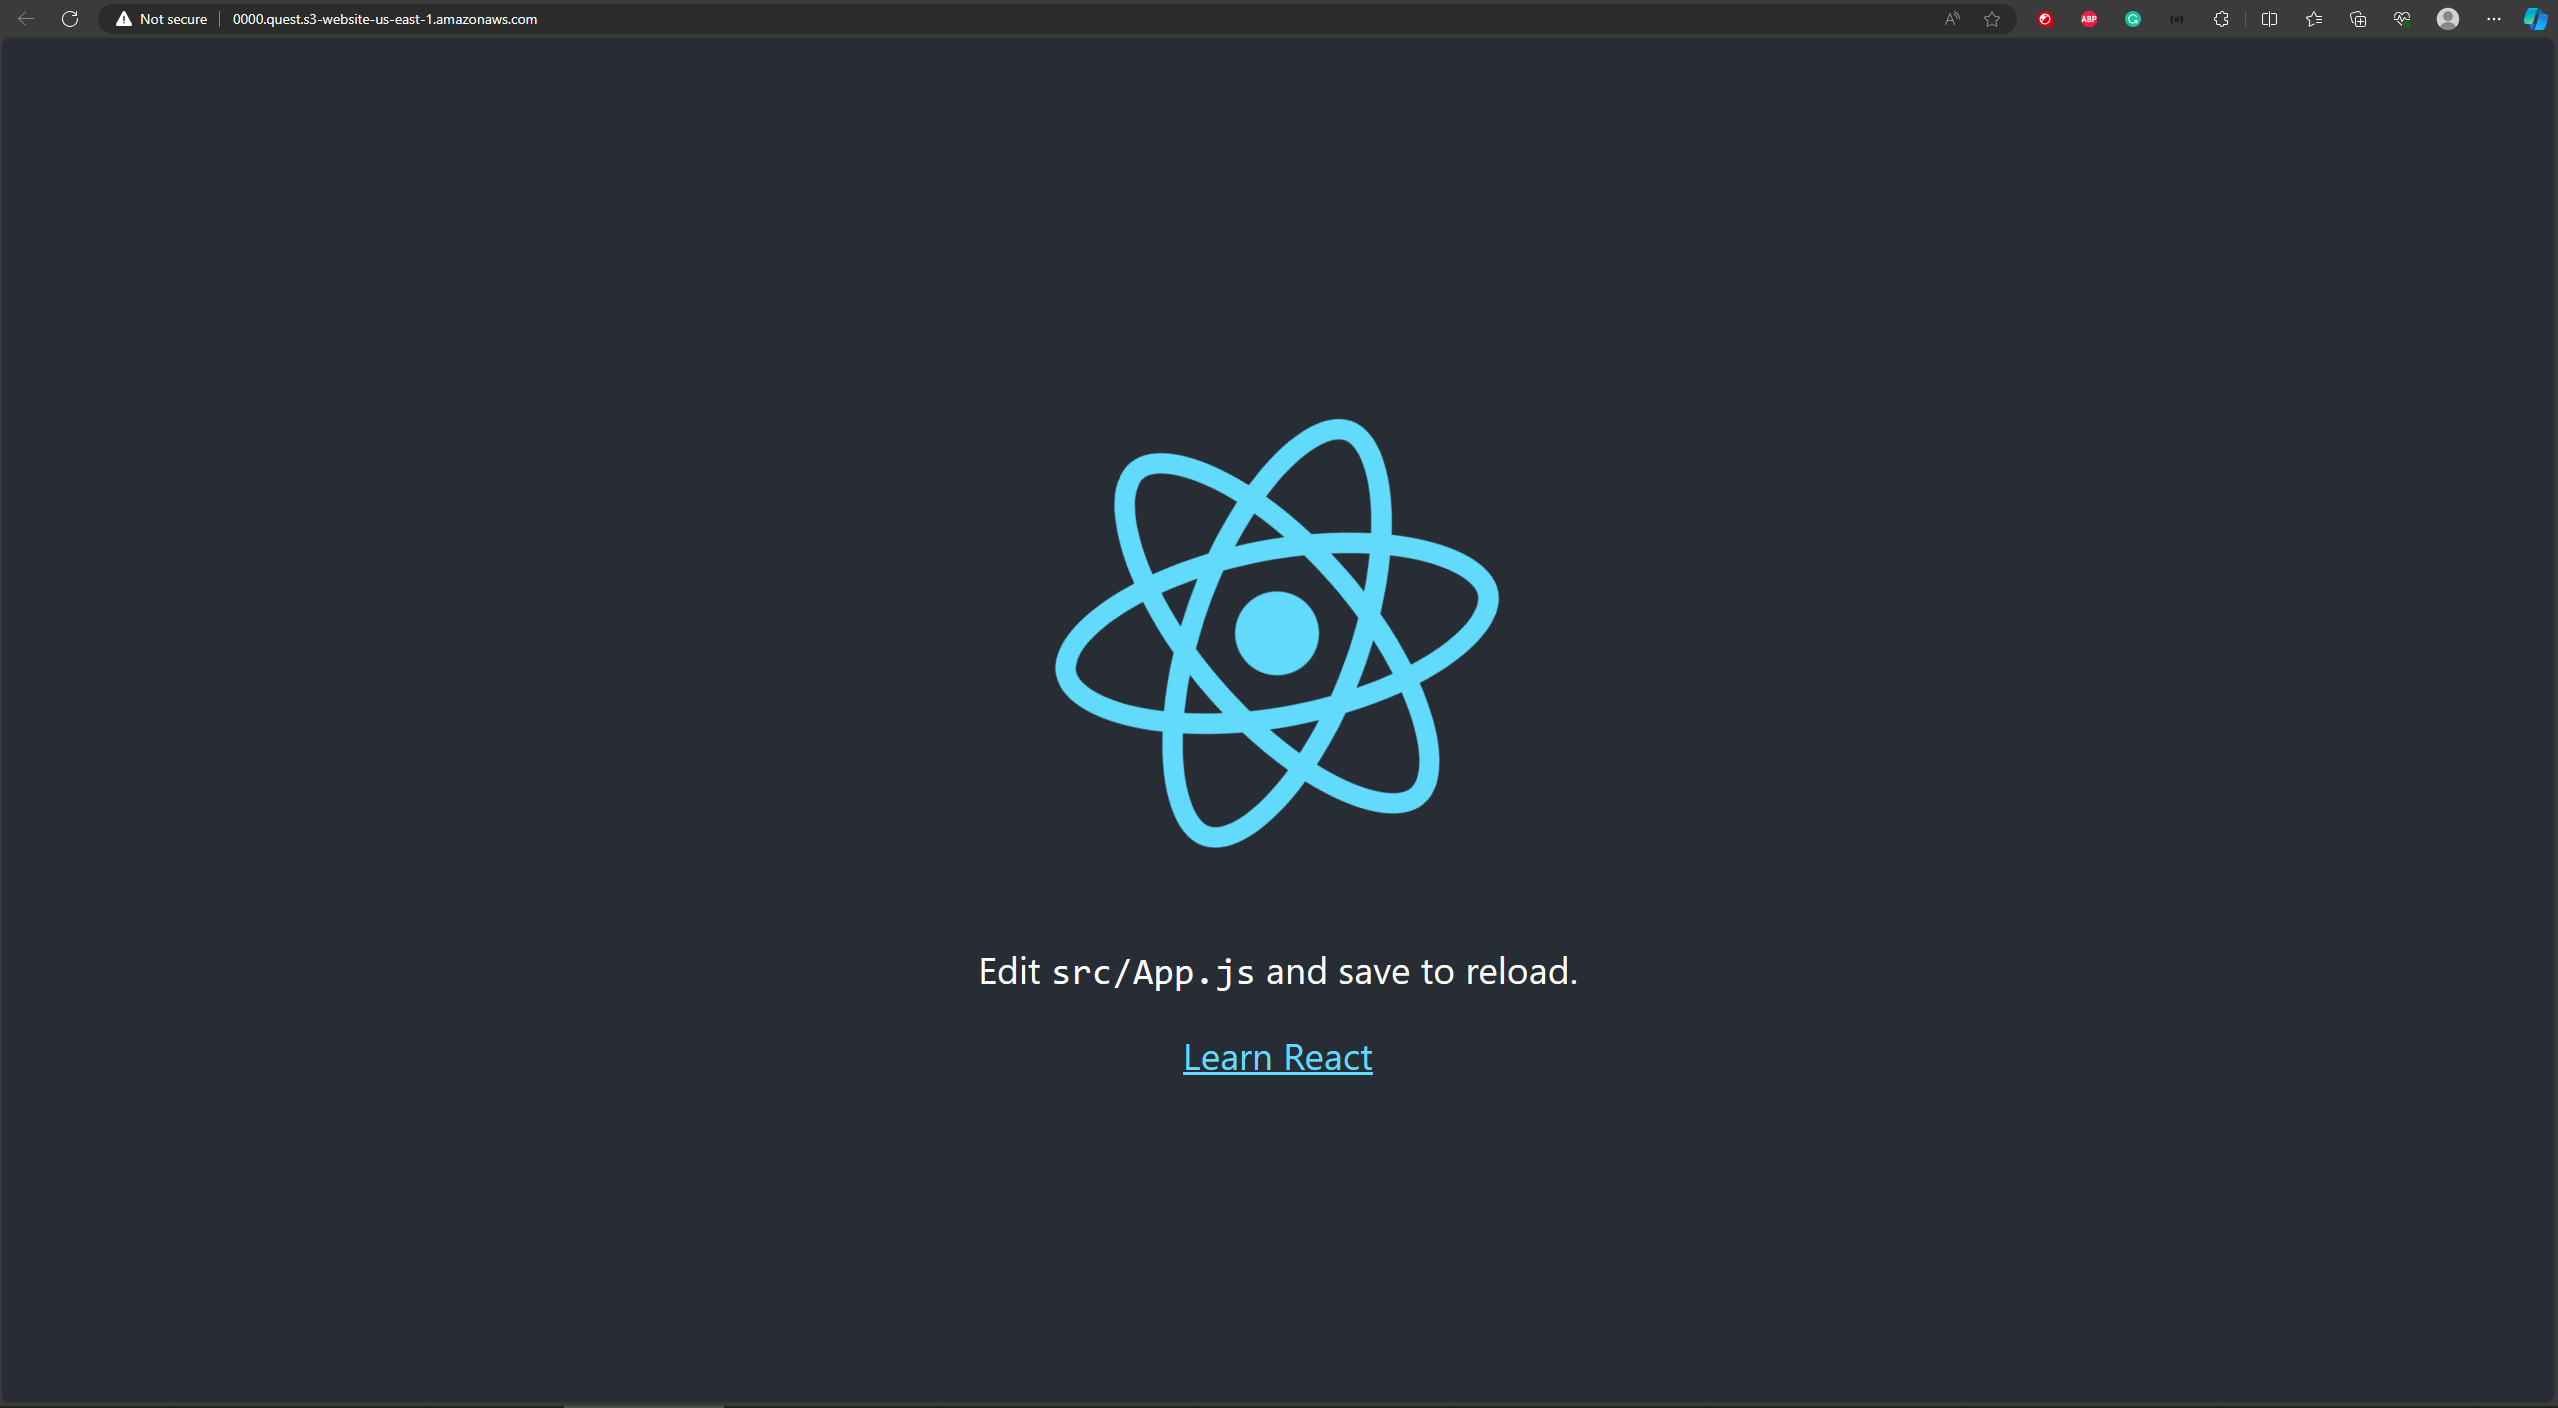
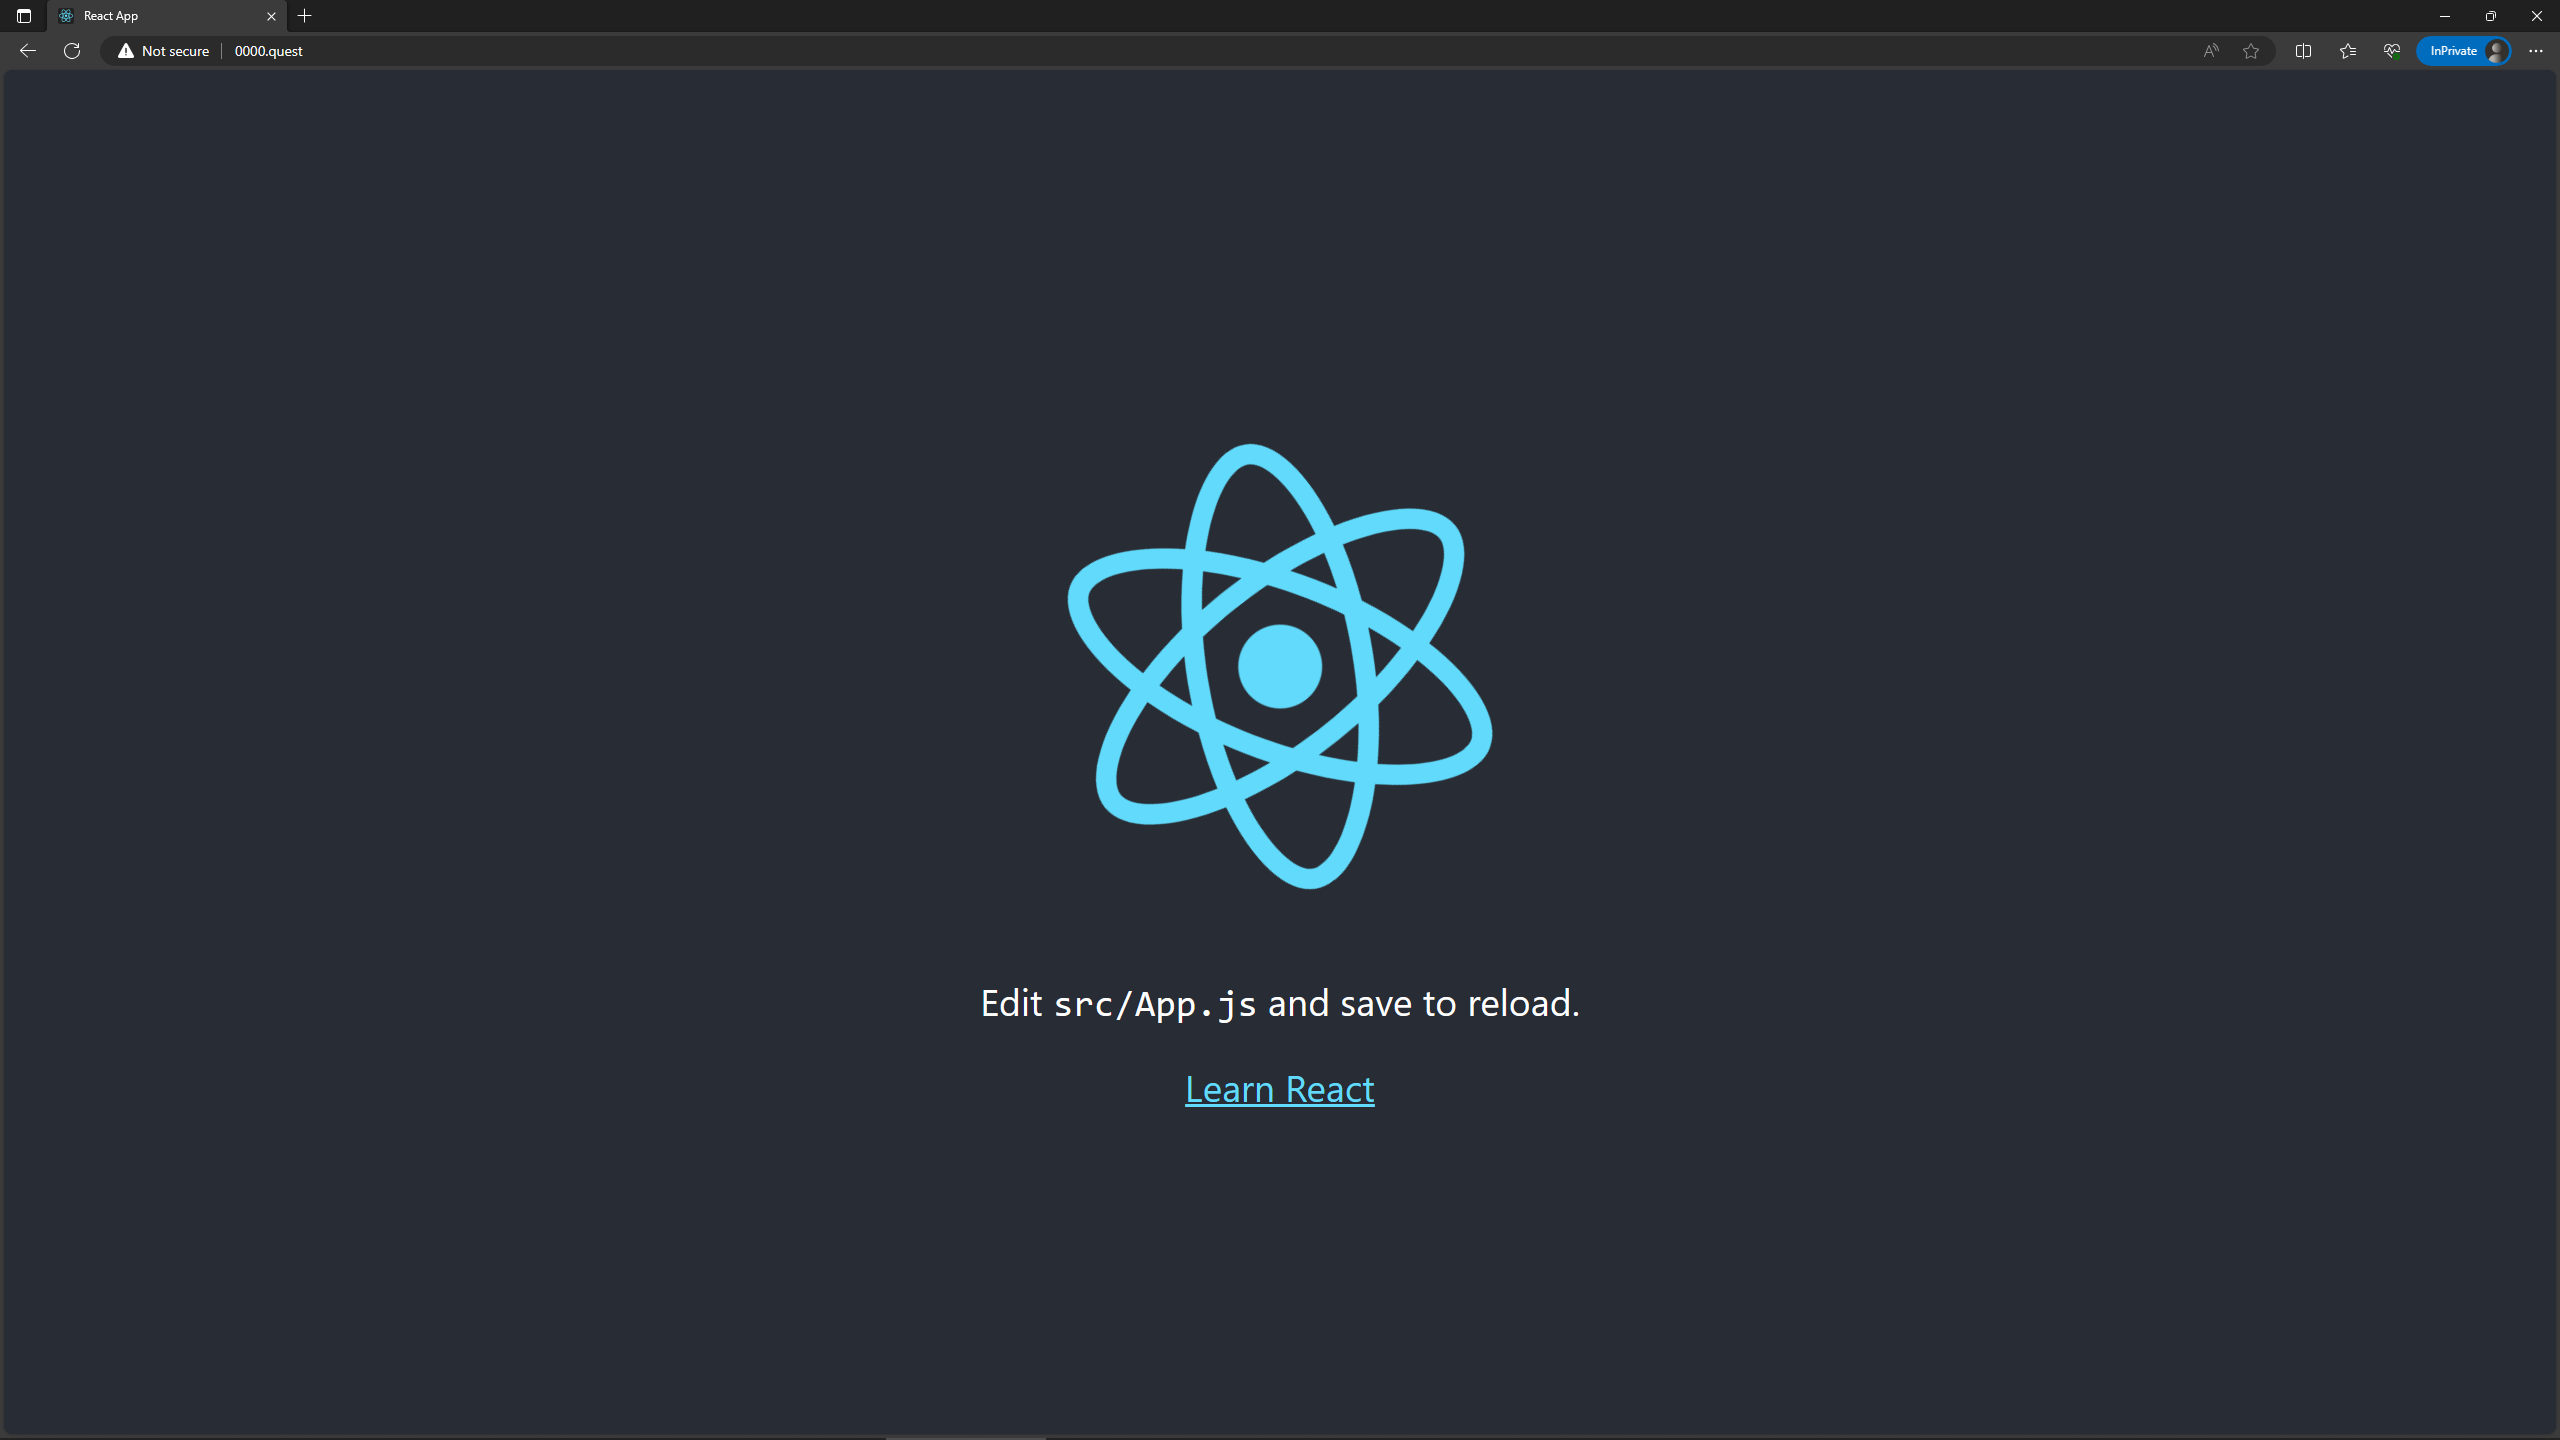
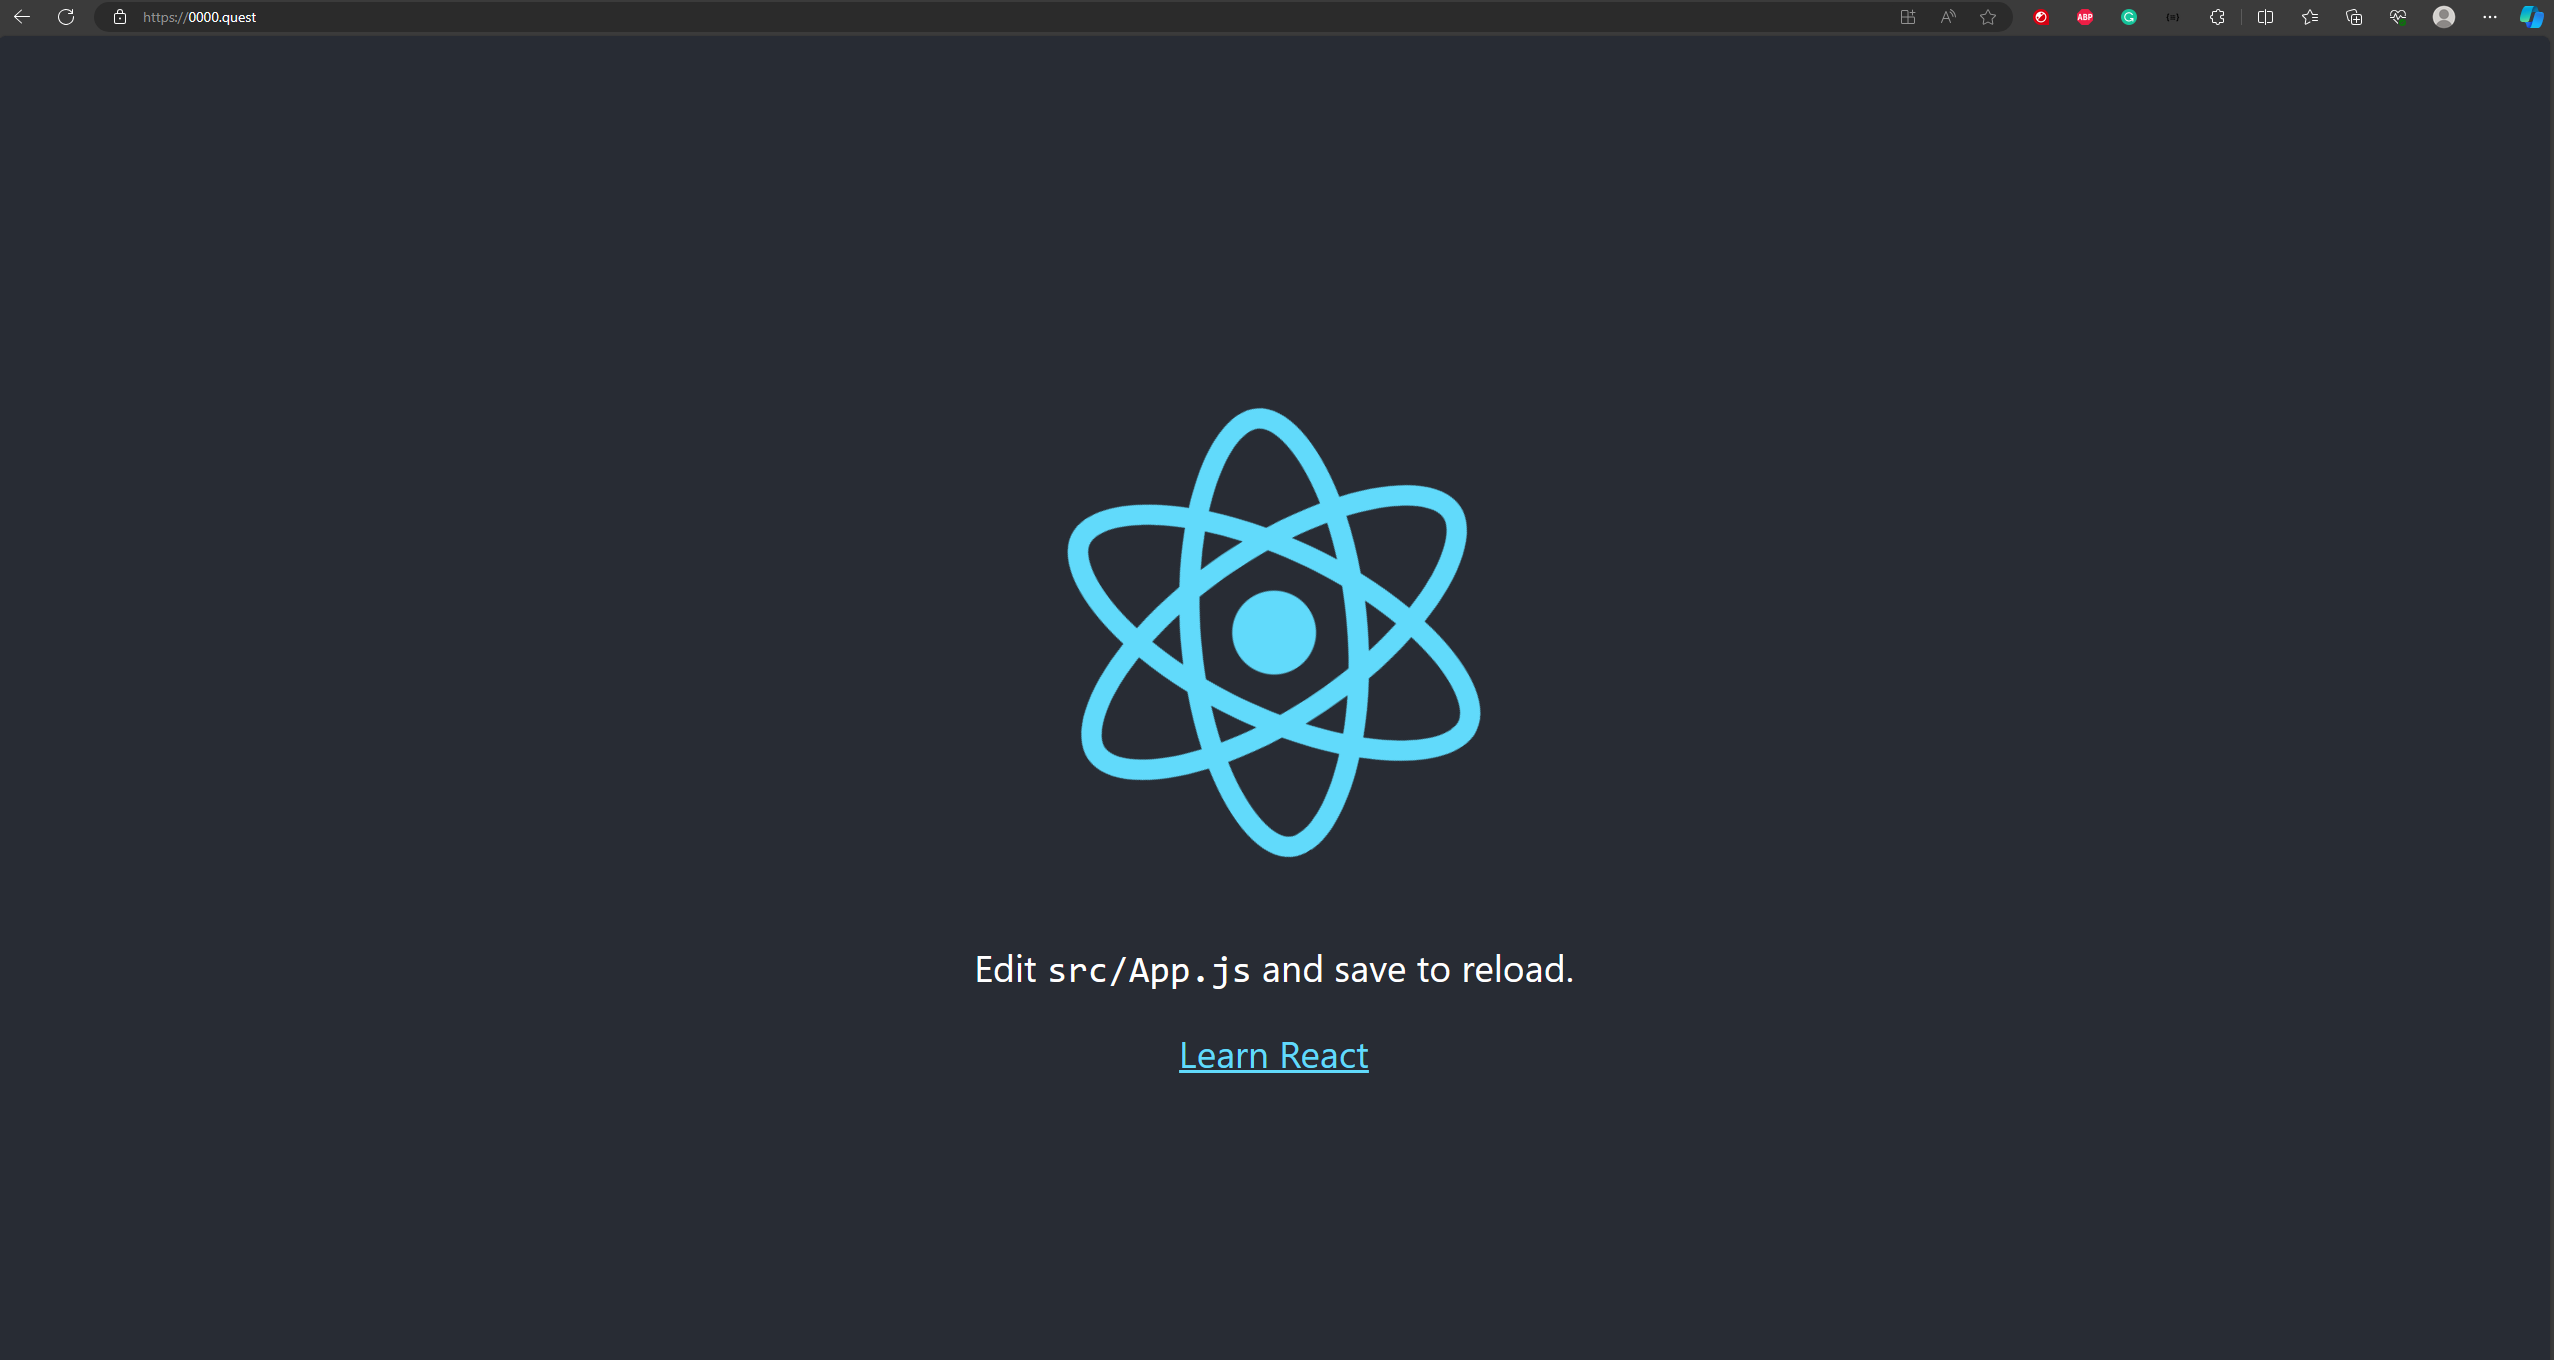
Once those records are created, you should immediately be able to access your site on your domain, both with & without the www subdomain(in this example 0000.quest & www.0000.quest). If you used an external registrar & your nameservers haven't propagated yet then the AWS records won't be hit & you won't be able to hit your site, but it should all propagate rather quickly. Most domain registrars reflect name server updates in around 30 minutes. Below is the screenshot I took of the site around 5 seconds after updating the record, as you can see, it's using the domain, so it propagated rather quickly. Also, if you type in the www subdomain it forwards to the standard site without the www subdomain prefix, as intended.
At this point if you just wanted a way to show people your site & don't care for an SSL certificate to get that sweet sweet HTTPS in front of your domain, then I guess you can stop here, but you might as well keep going & add the SSL cert & CDN caching. 🤷♀️
Creating SSL certificate in Certificate Manager
Let's go ahead & create an SSL certificate in Certificate Manager. Before you start, you'll need to change your region in the AWS Management Console to us-east-1, this can be changed by clicking the top right of the console, right next to your name. This is an important step, as your certificate won't be accessible in CloudFront if it's in the wrong region. 😅

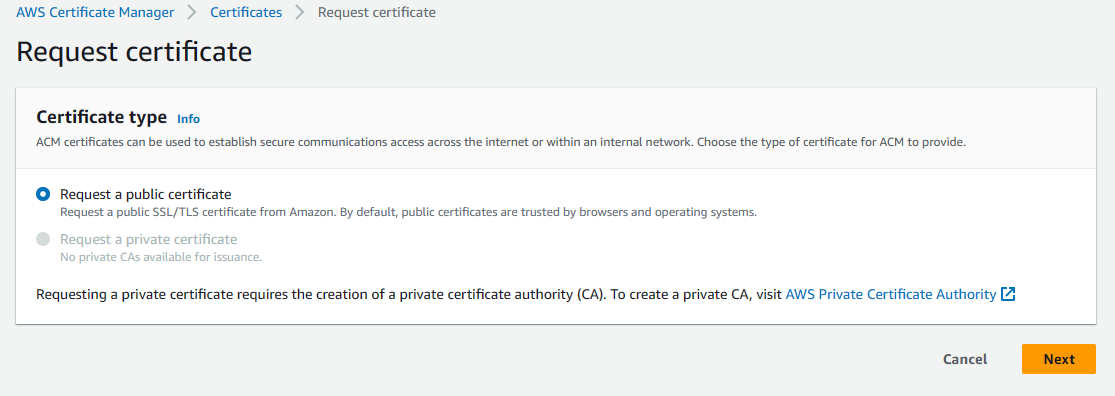
Navigate to Certificate Manager by searching for it in the search bar in the AWS Management Console. Click the request a certificate button to generate a new SSL certificate for your site. Select public certificate & hit next.
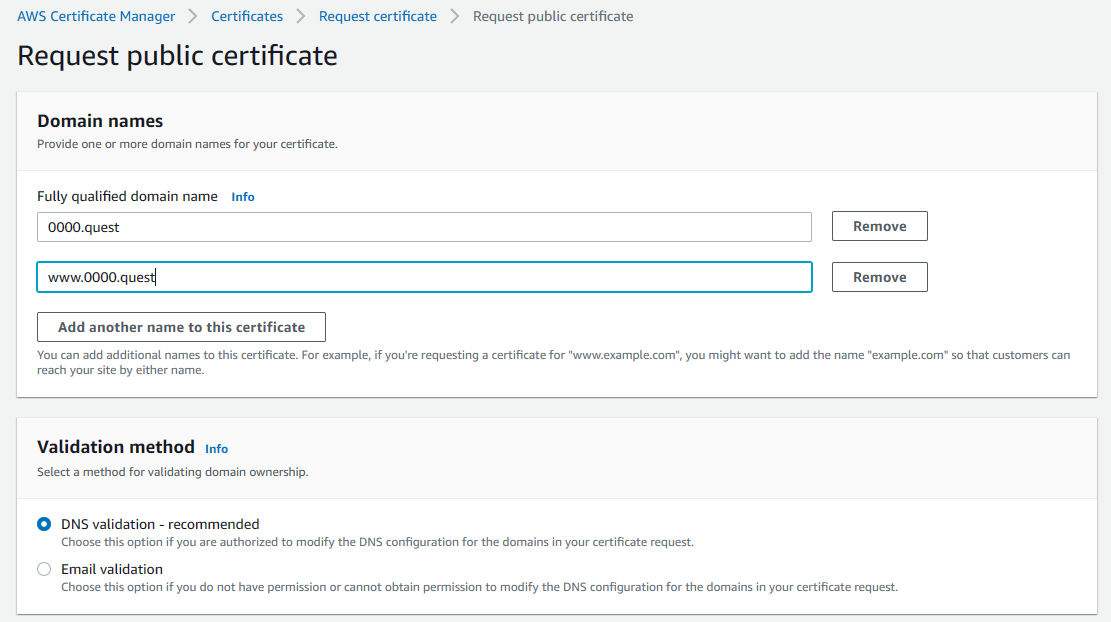
On the next page, add both your domain & your www subdomain under domain names. This is an important step as you cannot change this later & you'll have to delete the cert & redo it to change this. Set validation method to DNS validation then leave all other settings default & hit request to generate the certificate.
Once you submit the request, the cert will need to be validated. In the list certificates tab of the Certificate Manager console, select the certificate you just created, if you have multiple, look for the one with your domain name. Once there, under Domains, there is a button to create records in Route 53 at the top right of the domains section, click that button.

Then hit the create records button to create the records.
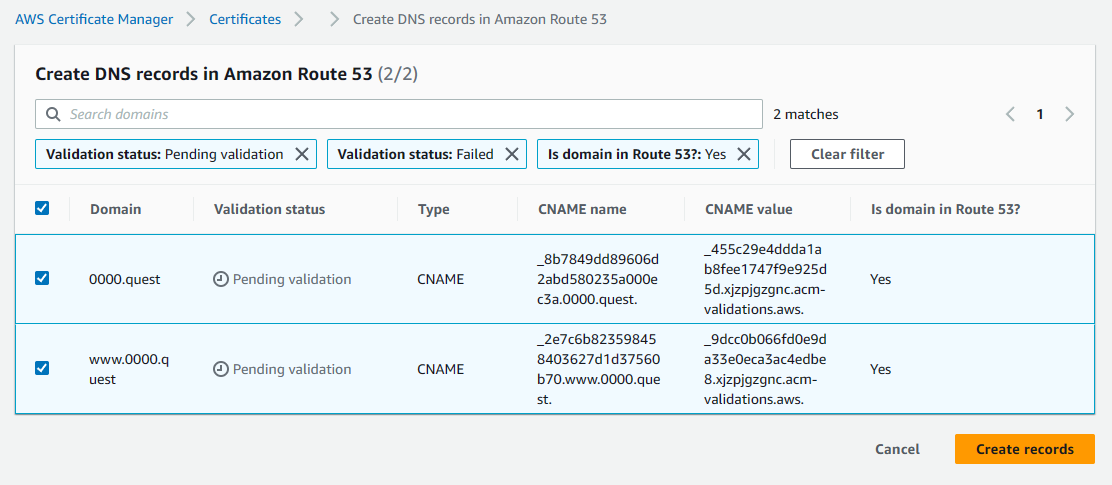
This allows AWS to verify ownership of the domain by creating custom DNS records for the provided URLs, this can only be done by someone with access to the registrar or a provider with access to the name servers the registrar is pointing to. This is a security step. Once you create those records, after a few minutes, you should see the status in certificate manager change from pending to issued.

Cloudfront distribution configuration
Now that the certificate exists, it's time to configure CloudFront using the certificate. Quickly navigate to the S3 buckets created earlier & grab their URLs. It's at the bottom of the properties tab for each bucket under the static website hosting section. You'll need these for the CloudFront configurations.
Navigate to the CloudFront console in the AWS Management Console by searching for it in the search bar. Once there, switch to the distributions tab & click the create distribution button to start the setup.
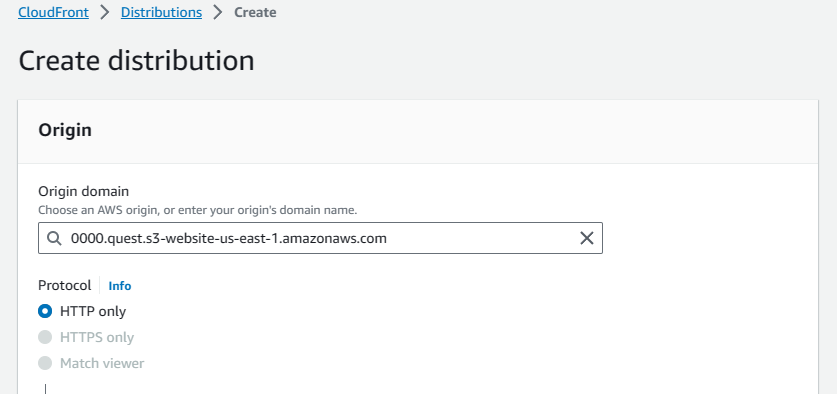
In the origin section, paste the primary bucket's public URL copied earlier into the origin domain.
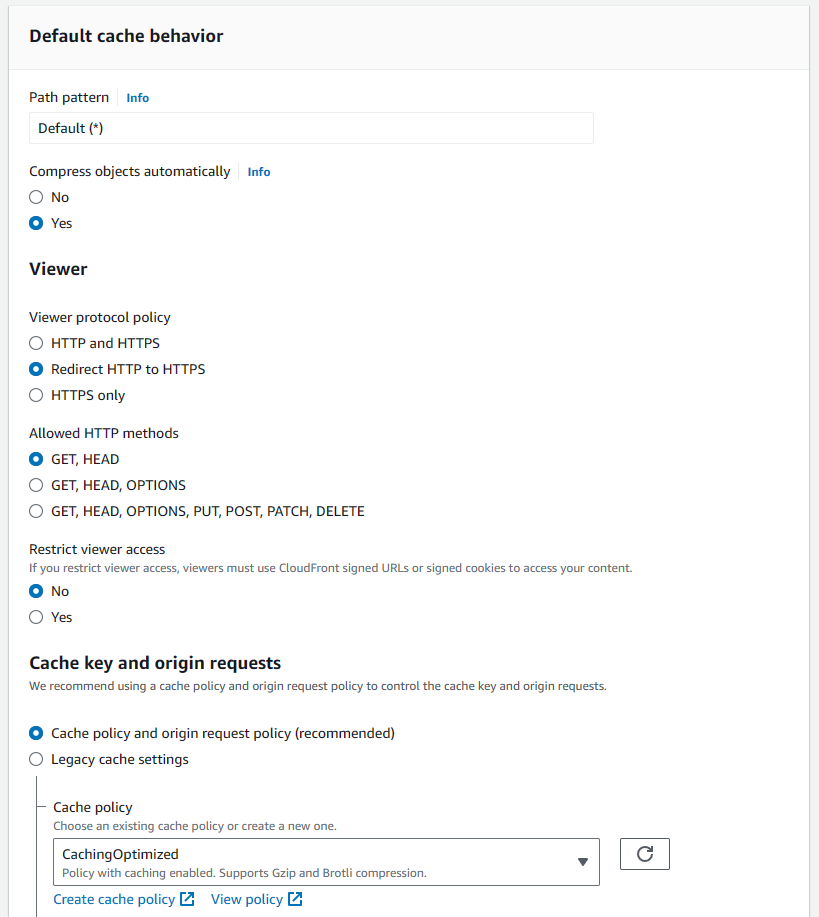
Scroll down to the default cache behavior section, change "viewer protocol policy" to redirect HTTP to HTTPS. This ensures that users will be accessing your site securely over HTTPS once it's using the CloudFront CDN. Also, set the cache policy to caching optimized. I didn't capture this in the screenshot, but the Web Application Firewall (WAF) can be disabled here, so that's what I did. 😅
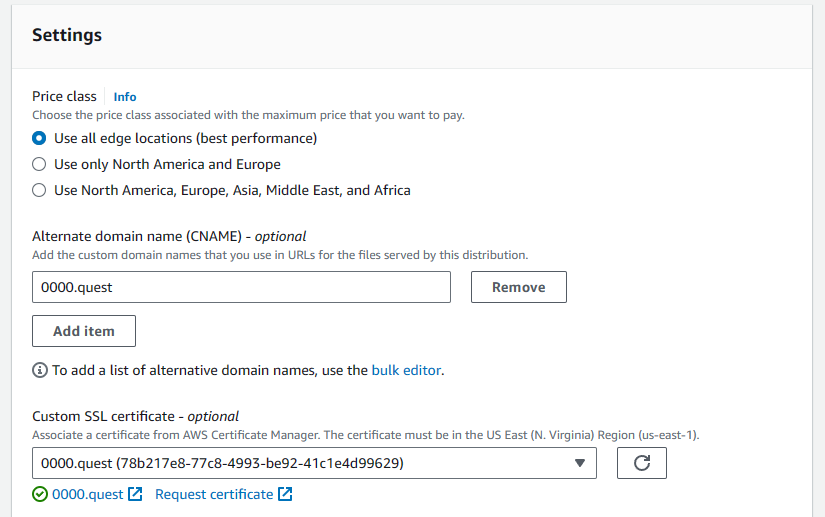
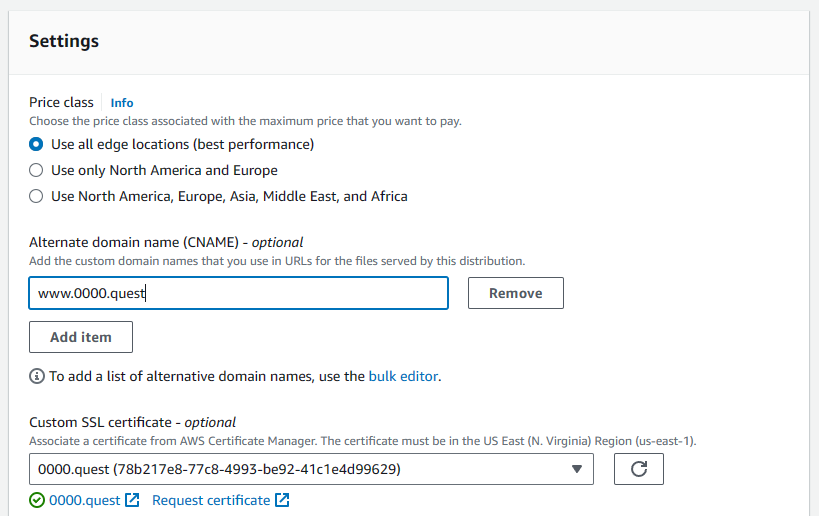
Scroll down to settings, here you'll add the alternate domain name, this allows you to bind your domain name to the CDN. Here, I'm doing the primary domain without the www subdomain (0000.quest). Then, under the "custom SSL certificate setting," select your previously made certificate from the dropdown. Leave all other settings default. Hit create distribution.
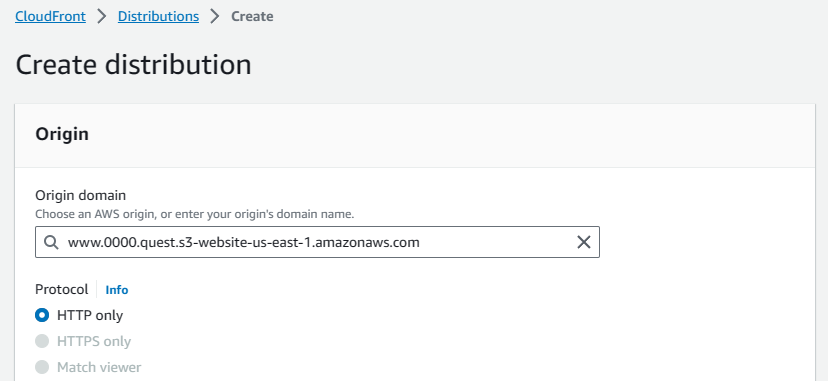
Once that's created, we have to do a second distribution for the www subdomain (www.0000.quest). The settings are the same, we start by copying that www bucket's public URL into the origin field.
Again, in the default cache behavior we're going to change to redirect HTTP to HTTPS & set the cache setting to caching optimized. Again, I disabled the Web Application Firewall here, it's not captured in the screenshot, but it's a single radio button, so you should be able to find it 🤷♀️. It's also a required setting, so you need to do that.
Then, in the settings we add the www subdomain as an alternate domain name & select the SSL cert we made earlier.
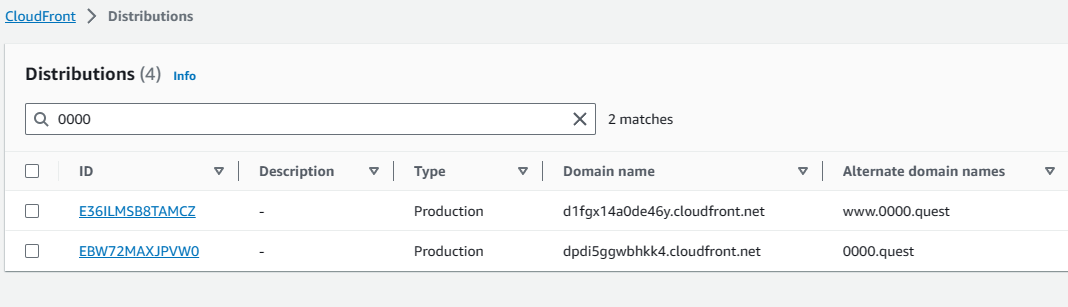
Once those distributions are created, it takes a few minutes to deploy, but that's okay because we have some changes to make to S3 & the DNS records anyway. We can do those while they finish deploying. In the list distributions tab of the CloudFront console you can see the domain names for your distributions, copy those & save them. We'll need those to change some settings for our final configurations for our S3 buckets.
Tying it all together
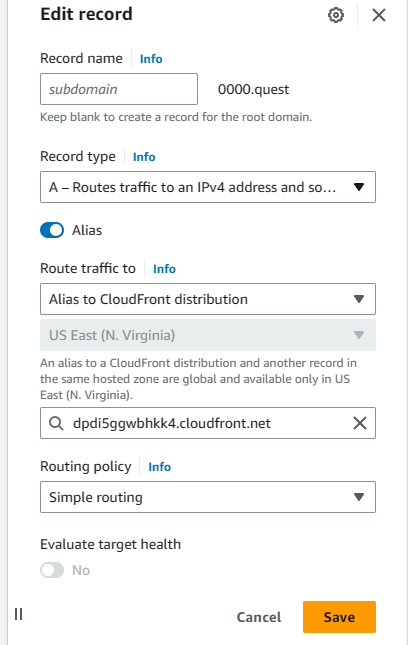
Navigate back to the Hosted Zone configured before. We have to edit the previously made A records to point to the CloudFront distributions instead of the S3 buckets. Select the primary domain's A record first & hit edit. It will remain an alias, but switch the "Route traffic to" dropdown to "Alias to CloudFront distribution" then from the dropdown select the distribution, there should only be one available, but make sure it's pointing to the correct URL for the primary distribution. This is why I asked you to copy the URLs for the distributions earlier.
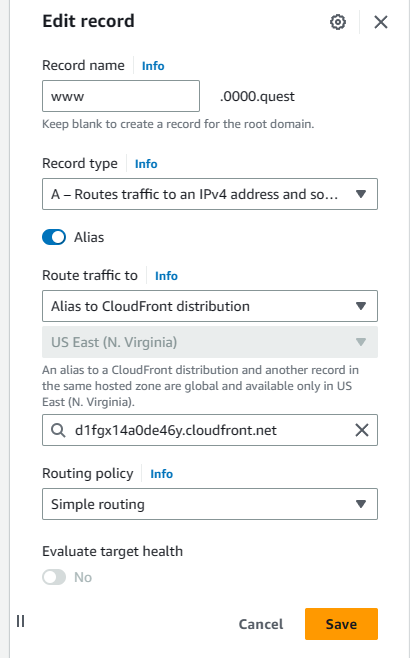
Hit save, then select the subdomain A record & hit edit. Same deal as the last one. Route the traffic to CloudFront distribution, select the distribution & verify the URL, then hit save.
One last thing. Now that the DNS records & CloudFront CDN are setup, we just need to change one setting for the bucket with the www subdomain to finish up the bucket settings. Navigate to that bucket's static website hosting settings in the bucket properties tab & hit edit. At the bottom, switch the protocol from HTTP to HTTPS & hit save.
Now we should be done. If you navigate to the domain you configured, you should be able to see your site hosted with HTTPS; additionally if you go to the site's www subdomain, you should be able to get redirected to the primary URL, as shown below.
This is just a simple deployment process & may not be ideal for most use cases as it requires manually uploading builds to S3 to update the site, which is why in my next tutorial, I will be showing you how to setup continuous deployment with github actions so you can update your site in an automated fashion by simply pushing code to github.
Thanks for following my tutorial. If you like this content or want to make suggestions, feel free to tag me in a post on twitter. This was my first tutorial, so don't roast me too bad 😅. @the_whittington